

Emergency lights play a critical role in ensuring safety during power outages, fires, or any unexpected emergency situations. These lighting systems are designed to automatically activate when the main power supply fails, guiding people to safe exits and preventing panic in dark environments. At the heart of every emergency light system lies the emergency light battery, which is the component responsible for storing energy and powering the light when electricity is no longer available. Over time, however, the emergency light battery will degrade and lose its ability to hold a charge, which means it must be replaced periodically to ensure the system remains fully functional. Understanding how to change emergency light battery is an essential skill for any homeowner, business owner, or facility manager. Whether you are dealing with a wall-mounted unit, a ceiling-mounted fixture, or a standalone exit sign, knowing the proper procedure for replacing the emergency light battery can save you money and ensure your safety systems are always ready when you need them most. In this comprehensive guide, we will walk you through everything you need to know about how to change emergency light battery, including step-by-step instructions, important precautions, and best practices to keep your emergency lighting in top condition.
How to Change Emergency Light Battery: Step-by-Step Solution
Changing the emergency light battery is a straightforward process that most people can complete on their own with basic tools and a little bit of patience. The following steps will guide you through the entire process of how to change emergency light battery safely and effectively.
Step 1: Identify the Type of Emergency Light Battery You Need
Before you begin the process of how to change emergency light battery, you must first identify what type of emergency light battery your system uses. The most common types of emergency light battery found in modern emergency lighting systems are sealed lead-acid (SLA) batteries, nickel-cadmium (NiCd) batteries, and lithium-ion batteries. Each type has different voltage ratings, usually 3.6V, 6V, or 12V. Check the label on your existing emergency light battery or refer to the user manual to determine the correct replacement. Using the wrong emergency light battery can damage your lighting system or result in a system that does not function properly during an emergency.
Step 2: Turn Off the Power Supply
Safety should always be your top priority when learning how to change emergency light battery. Before you begin, turn off the main power supply to the emergency light unit. This is typically done at the circuit breaker panel. Even though the emergency light battery operates on stored energy, it is still wise to disconnect the main power to avoid any risk of electric shock. Additionally, some systems may have a test switch — press and hold the test button for a few seconds to fully discharge any residual charge in the emergency light battery before proceeding.
Step 3: Access the Emergency Light Battery Compartment
Most emergency light fixtures have a dedicated compartment or cover that houses the emergency light battery. Use a screwdriver to remove the screws holding the battery cover in place. In some models, the cover may simply snap off or slide open. Be gentle when opening the compartment to avoid damaging the housing. Once the cover is removed, you should see the emergency light battery sitting in its designated slot. Take note of how the emergency light battery is positioned, including the orientation of the positive (+) and negative (-) terminals.
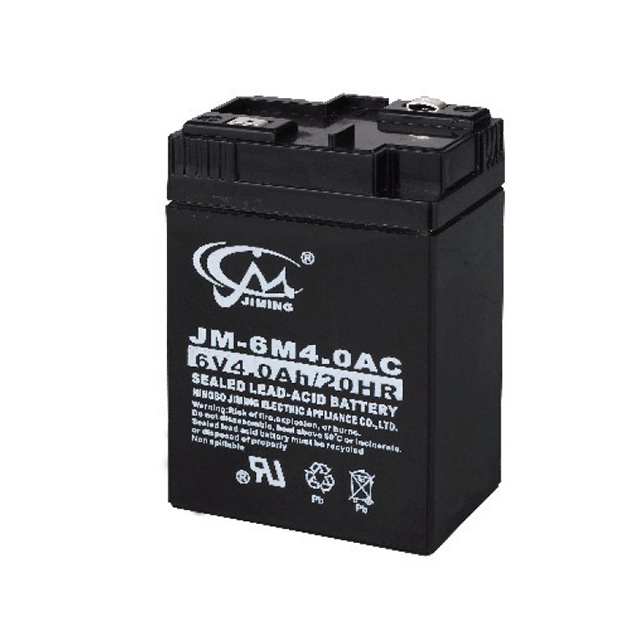
Step 4: Remove the Old Emergency Light Battery
Carefully disconnect the emergency light battery from its wiring connectors. Most emergency light battery units use plug-in connectors with color-coded wires — red for positive and black for negative. Gently pull the connectors away from the terminals. If the connectors are stuck, do not force them; instead, wiggle them gently until they come free. Lift the old emergency light battery out of the compartment and set it aside for proper disposal. Remember that old emergency light battery units contain chemicals that can be harmful to the environment, so they should be recycled at a designated collection point rather than thrown in the regular trash.
Step 5: Install the New Emergency Light Battery
Take your new emergency light battery and position it in the same orientation as the old one. Connect the positive (red) wire to the positive terminal and the negative (black) wire to the negative terminal. Make sure the connections are secure and snug. A loose connection can cause the emergency light battery to fail prematurely or not charge properly. Once the new emergency light battery is securely in place, replace the battery cover and fasten it with the screws you removed earlier.
Step 6: Test the New Emergency Light Battery
After completing the installation of the new emergency light battery, restore the main power supply at the circuit breaker. Press the test button on the emergency light unit. The light should turn on immediately, indicating that the new emergency light battery is working correctly. Let the unit charge for at least 24 hours to ensure the emergency light battery reaches full capacity. After 24 hours, perform another test to confirm the system is functioning as expected.
Important Precautions When Changing Emergency Light Battery
While the process of how to change emergency light battery is relatively simple, there are several important precautions you must follow to ensure safety and proper functionality.
1.Always Use the Correct Emergency Light Battery Specification
One of the most common mistakes people make when changing emergency light battery is using the wrong type or voltage. An incompatible emergency light battery can cause overheating, leakage, or complete system failure. Always double-check the specifications before purchasing a replacement emergency light battery.
2.Handle the Emergency Light Battery with Care
The emergency light battery contains chemicals that can be corrosive. Avoid touching the terminals with bare hands, as the oils from your skin can cause corrosion over time. Wear gloves when handling the emergency light battery, and if any acid leaks from the battery, clean it immediately with a baking soda and water solution.
3.Do Not Mix Old and New Emergency Light Battery
If your emergency light system uses multiple emergency light battery units, replace all of them at the same time. Mixing old and new emergency light battery units can lead to uneven charging and reduced overall performance. A fresh emergency light battery paired with an old one will be dragged down by the weaker unit.
4.Follow Local Disposal Regulations for Old Emergency Light Battery
Never dispose of an old emergency light battery in the regular household waste. Lead-acid and nickel-cadmium emergency light battery units are classified as hazardous waste in many regions. Take your old emergency light battery to a recycling center or a retailer that accepts used batteries.
5.Schedule Regular Emergency Light Battery Checks
Even if your emergency light appears to be working, the emergency light battery may be slowly losing capacity. It is recommended to test your emergency light battery at least once a month and replace it every 1 to 3 years, depending on the manufacturer's recommendations. A well-maintained emergency light battery is the key to reliable emergency lighting.
Conclusion
In conclusion, knowing how to change emergency light battery is a vital maintenance skill that ensures your emergency lighting system remains reliable when it matters most. The emergency light battery is the lifeline of any emergency light fixture, and without a properly functioning emergency light battery, your safety systems could fail during a critical moment. By following the step-by-step instructions outlined in this guide, you can confidently replace the emergency light battery in any emergency light unit, whether it is a simple exit sign or a complex ceiling-mounted system. Remember to always use the correct type of emergency light battery, handle it with care, dispose of old units responsibly, and test your new emergency light battery thoroughly after installation. Regular maintenance and timely replacement of the emergency light battery will not only extend the life of your emergency lighting system but also provide peace of mind knowing that your family, employees, or building occupants are protected in the event of an emergency. Investing a few minutes today to change your emergency light battery could make all the difference tomorrow. Keep your emergency light battery fresh, keep your lights on, and stay safe.

Phone: 0086-13566557272
Whatsapp: +86-13566557272
ADD: No.546 Qiye Road, Zhouxiang Town, Cixi, Zhejiang, China
ADD: Within Dinh Vu - Cat Hai Economic Zone, Dong Hai 2 Ward, Hai An District, Hai Phong City, Viet Nam
Customer Message


 Dual Head Emergency Light
 LED Emergency Light Remote Head
 Twin Spot Emergency Light
 Rechargeable LED Emergency Light
 Emergency Downlight
 Fire Exit Sign
 Running Man Exit Sign
 SALIDA Exit Signs
 SAÍDA Exit Signs
 Recessed Exit Sign
 UL Listed Exit Light
 Customized EXIT SIGN
 Power & Lighting Exit Sign
 Mounting & Housing Exit Sign
 Self Test Exit Sign
  Directional exit sign
 Custom Legends exit sign
 Custom Acrylic Signs
 LED Emergency Inverter
 Emergency Ballast
 Emergency Battery